Upgrading SDCX Servers
Upgrades to Signiant SDCX Servers, previously known as Media Shuttle Storage Servers, add new features and stability improvements to your on-premises storage, and allow for cross-functionality with Signiant Jet. Upgrade your SDCX Server routinely to get the best transfer performance and security when using Media Shuttle.
To complete an upgrade of an on-premises server, it may be necessary to uninstall your Signiant SDCX Server. See Installing and Uninstalling Storage Servers for more information.
Checking Your SDCX Server Version
Before upgrading your server, check the installed Signiant SDCX Server version on the Storage tab in your IT Administration Console.

If your organization is not using the most recent release, you can upgrade your SDCX Server using an automated or manual download after ensuring that your server meets system requirements.
Note: If your operating system does not meet system requirements, you must migrate your server to a supported operating system prior to upgrading.
Downloading SDCX Server Updates
Automated Download
Your Signiant SDCX Server checks for updates every day at 00:00h local time to determine if there is a new version available to download. Whenever a new version becomes available, the SDCX Server downloads an installer to your application's update folder in your Media Shuttle application folder.
Note: Your SDCX Server will also download any available updates whenever the storage service restarts. If your server has already downloaded the installer, your server will install the upgrade automatically when the service restarts.
Microsoft Windows
To upgrade your SDCX server:
- Open your browser.
- Navigate to your Signiant Media Shuttle application folder, e.g.
C:\Program Files\Signiant Media Shuttle. - Open the
updatefolder. - Double click the installer
.exefile to start the upgrade.
Linux
To upgrade your SDCX Server:
- In your terminal, navigate to your Signiant Media Shuttle application folder, e.g.
/usr/Signiant_Media_Shuttle. - Open the
updatefolder usingcd update. - Extract the installer from the tarball.
- Run
install.shto start the upgrade.
Upgrading your SDCX Server briefly stops the Media Shuttle services, and Media Shuttle is not accessible while the services are stopped.
If any transfers to your SDCX Server are in progress when the upgrade starts, you have the option to cancel the installation and wait for the transfers to finish before installation.
Note: Media Shuttle upgrades do not require a new registration key unless the server software is uninstalled prior to an upgrade.
After completing the upgrade, you can verify completion by checking the version number in your IT Administration Console.
Manual Download
If you have disabled automatic updates for your Signiant SDCX Server, you must manually download Media Shuttle updates from the IT Administration Console or through a link below.
Download the Signiant SDCX Server installer for your operating system.
Note: By downloading the Signiant SDCX Server software you agree to the software license agreement
Operating System Migration
Signiant SDCX Server software version 4.2.0 or higher removes support for operating systems that were previously supported for Signiant Media Shuttle Storage Servers. These operating systems include:
- Red Hat Enterprise Linux 6
- CentOS Linux 6
- Microsoft Windows 7
- Microsoft Windows 8.x
- Microsoft Windows Server 2012
Prior to upgrading your SDCX server, you can use a new server, or migrate your existing server to a supported operating system.
Migrating to a New Server
Migrating your SDCX installation to a new server with a supported operating system allows for minimal downtime when upgrading a server. This allows you to keep an existing storage server connected prior to switching over to a new server.
Note: Before installing the server, ensure that it meets all hardware and network requirements.
To migrate to a new server:
- Install the Signiant SDCX Server software on the new server.
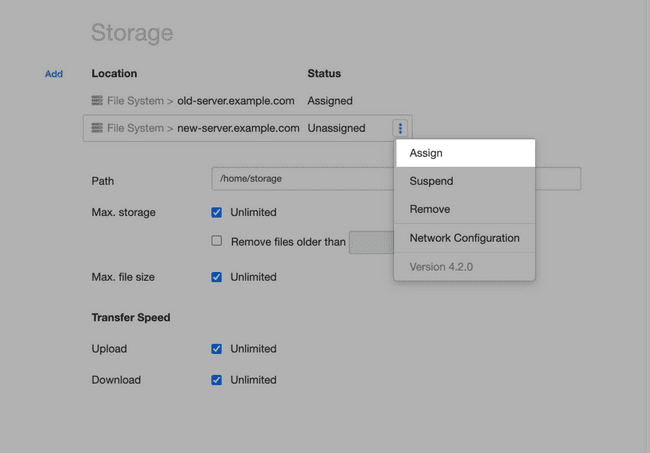
- In the IT Administration Console, on the Storage tab, verify that the new server is displayed in the Locations list.
- Assign the new server to the current portal.

-
Unassign the old server from the portal.
-
Click Save Changes.
Once you have assigned the new server, use the portal selection drop-down menu and select the other portals in your account that require the new server. The new server will automatically appear in all other portal storage locations, and can be assigned and configured as required.
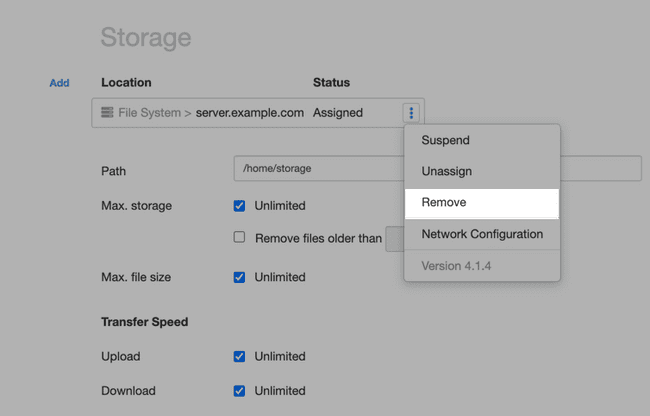
Once all portals have been reassigned, remove the previous storage server.
Note: If new machine is a Windows server and the path listed for the portal is a UNC configure see Using Shared Storage to ensure the storage location can be accessed.
Migrating an Existing Server
Preparing for Migration
Before migrating a server, ensure that it meets all hardware and network requirements for the SDCX server and the related operating system.
For servers deployed using multiple ports, relays, or proxies, record all custom network configuration and other advanced configuration options before upgrading the server.
Before migrating a Windows storage server, complete the following:
- On the server, open the Services control panel.
- Locate all Signiant Server related processes.
- Record the Log On As user associated with each process.
Once the migration is complete, you must associate all of the Signiant SDCX Server processes with the user accounts assigned prior to the upgrade.
Server Upgrade and Migration
To upgrade your storage server:
- Uninstall the server software.
- Remove the server from the current portal.

-
Use the portal selection drop-down menu to navigate between all of your organization's portals and remove the server from the Storage tab for each portal.
-
Upgrade the operating system using one of the following guides:
-
Install the Signiant SDCX Server software on the server.
-
Log into the IT Administration Console and assign the server to the current portal.
-
Click Save Changes.
Once you have assigned and configured storage, use the portal selection drop-down menu to select the other portals in your account and reassign the storage server as required.
Troubleshooting SDCX Server Updates
If the SDCX Server has not updated after running the installer:
- Reboot the SDCX Server to ensure that all Media Shuttle processes have restarted.
- Check the
updatedirectory for any.skipfiles, which indicates the upgrade did not complete and the SDCX Server is running your previous version. Delete the.skipfiles and retry the upgrade. - If the installation fails, send the
Signiant Media Shuttle install.logfile in thelogfolder to Signiant Customer Support. - For an automated download, check to see if the latest installer is present in the
updatefolder. If you do not have the latest version, download the installer manually.