Creating Portals
As an IT administrator, you have access to the IT Administration Console which allows for the addition and configuration of all portals associated with your account.
If you have multiple Media Shuttle accounts, you are prompted to select an account when logging into the console.
Adding New Portals
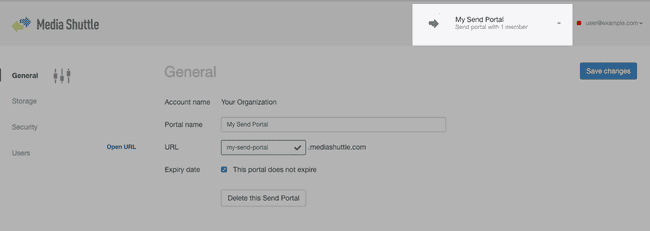
You can add a Send, Share or Submit portal through the portal list menu.
To add a portal:
-
Open the portal list menu.

-
Click Add Portal.
-
Choose Send, Share or Submit as the portal type.
Configuring Portals
Once you create the portal, you are directed to the new portal's General tab to configure it. The General tab allows you to configure the portal name, URL, and other portal aspects.
To configure a portal:
-
Set a Portal name.
- You can replace the default portal name with a custom name. The portal name identifies the portal to its members when they access the portal, or receive email notifications related to portal transfers.
-
Enter a portal URL.
- This is the URL used to access Media Shuttle. The full URL for the portal is:
<portalURL>.mediashuttle.com. The URL prefix cannot exceed 63 characters, and cannot start or end with a dash.
- This is the URL used to access Media Shuttle. The full URL for the portal is:
-
Configure the portal Expiry date. (Optional)
- This option allows you to stop the portal from accepting transfers after a specific date. By default, portals are configured without an expiration.
-
If you are configuring a Submit Portal, set whether to organize deliveries into unique folders.
- By enabling this option, transfers sent using a Submit Portal are organized into individual folders by portal member, containing folders for individual transfers. If you disable this option, all files are transferred to the storage root folder.
-
Click Save Changes.
Once you have configured the portal, you can assign storage, set security options, and add operations administrators through the Users tab.
Note: If you are using a trial portal, you cannot edit the portal configuration.
Changing a Portal Type
A Send, Share, or Submit portal type is set when a portal is created and cannot be changed.
To allow the members of a portal to maintain access the same storage while switching their portal type, you can export a member list from one portal to another.
To move members to a new portal:
- In the IT Administration Console, create a new portal with the new portal type.
- Configure the new portal's storage to match that of the original portal.
- Log into the original portal's Operations Administration Console at
<yourURL>.mediashuttle.com/admin. - Export portal members from the original portal.
- Log into the new portal's Operations Administration Console at
<yourURL>.mediashuttle.com/admin. - Import members to the new portal.
Once portal members have been transferred to the new portal, the original portal can be deleted.
Deleting Portals
To delete a portal, click Delete this Portal. You will be asked to confirm the deletion before it proceeds.